
At 8:00 a.m., November 3, 2007, red-eyed and flight-addled, Noel and I were huddling with our roller bags around cafe cremes across rue Cler from our favorite Greek-French café from the previous trip—Ulysse en Gaulle—which had yet to open.

Thanks to an IGMA travel/research grant, we were back in Paris, watching Parisians hurry through the market to work and school. Our mission was to find a design for our final project.
Paris in November in the rain felt like Oregon in November in the rain, but only as far as the weather went. In contrast to our spring trip there 3 years earlier, the crowds had thinned, making access to museums, wine, cheese and crostini as simple as walking through a door. By returning to the rue Cler neighborhood, we felt instantly at hom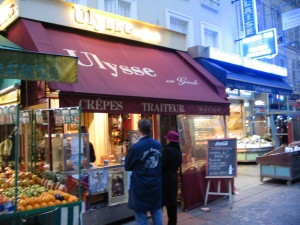 e, especially when Ulysse en Gaulle finally opened its doors, and the owner greeted us with effusive smiles and hugging. I’m sure he mistook us for someone else, but we rode with the welcome.
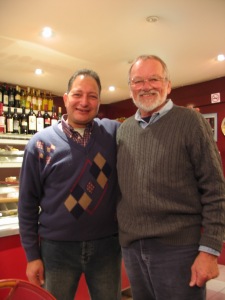
Noel with Marcos, the owner of Ulysse en Gaulle


For our last piece we were in search of an elusive something—a design, a little shop holding ground between the walls of taller buildings that had grown up around it. A David and Goliath feeling. We knew we had seen one, or some, or thought we had, it was just a matter of finding it, which we did one afternoon, walking the Left Bank near Notre Dame.
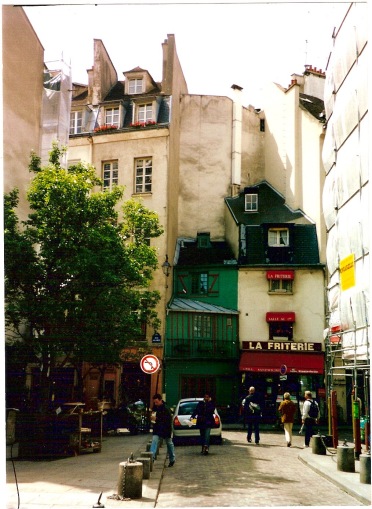
Inspiration for La Fenetre
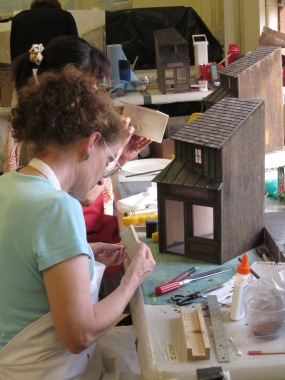
Another aspect of this project was Noel’s wanting to take it beyond miniatures per se, to design it as more of an art piece, a sculpture. He imagined an architectural anomaly, smaller and older than the towering white plaster buildings flanking it. It would be more of a vignette than a roombox, finding its ideal home on a shelf—a little wayside between the books. Something to be stumbled upon rather than showcased within a collection. Something that would require a lot of willingness on the part of our students to stretch their own ideas of what a miniature could be. Having faith in our fellow miniaturists, we forged ahead—Noel made a design, then a foam- core mockup so this Doubting Thomas could see how it worked.


Mock-up and sketch for project # 62.
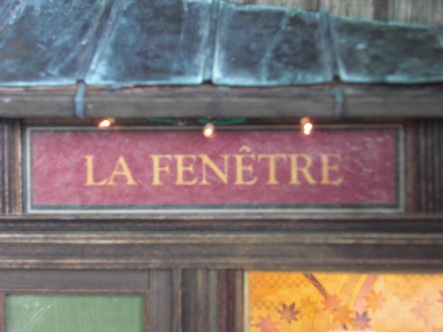
Since the focal point of the tiny shop would be the display window, we decided to name it after the french word for window–la Fenêtre. For our prototype, the window would be the only interior space we would finish. For me, the window display would be my first chance at miniature dress-making.
Our 2009 Guild School proposal went as follows: “This project was designed after a handful of tiny structures we found dotting the streets of Paris—quirkily-angled relics of another time, squeezed-in between taller, more modern buildings. It depicts a somewhat neglected cityscape, containing a shop with a single room, narrow door and display window, with a small room above, for, perhaps, the owner of the shop, or the one-time home of a struggling artist.
As always, we aim to create the illusion of reality of an aged structure, at home in its surroundings. Students will start with a wooden shell, to which they will apply finishing materials, including plastering, stripwood, and copper and shingle roofing. Classwork includes plastering, carving paving stones, finishing the door and windows, along with applications of various aging techniques, including watercolors, latex and acrylic paints, and Bug Juice.”
To our great relief, enough students to fill three classes came along for the ride. A year and a half later we were packing for class #1 in Castine:
 A few of the fourteen boxes packed to ship across country to Maine. After years of trial and error, I had pretty much figured how to pack things so they arrived intact.


Day one in the classroom–tidy, but not for long.
As was our time-honored routine, the workshop began with everyone Bug Juicing their plywood shells, gutters, roofs, window frames and door–anything that would be on the exterior of the building–to neutralize the raw plywood color. We went on to the copper roofing, much as described in the Au Petite entry, so I will not re-do it here. It might, however, be helpful to talk more in depth about the plastering techniques for both projects. We used Activa Art Plaster, ordered online. It is a moldable plaster of Paris that adheres well to plywood, and can be carved with an Exacto knife. We started by taping off the areas not to be plastered with masking tape.

Noel demonstrating plastering a wall.
Yogurt cups are great for mixing plaster–you want to work in small batches because it dries fast. We started each batch with 3 scoops (1 scoop=a rounded tablespoon) of plaster, then added 1/3 scoop cement adhesive (from the hardware store, it guarantees the plaster will stay stuck to the plwood base, though it may not be necessary), filling the remainder of the scoop with water (3 scoops plaster to 1 scoop liquid). Mix into plaster with an old metal fork or knife. If needed, add water sparingly, and mix throughly. You want a smooth, loose paste that can be spread easily with a putty knife, but isn’t runny–about the thickness of room temp. peanut butter. Smooth on to the project, avoiding streaks or edge marks from the knife.
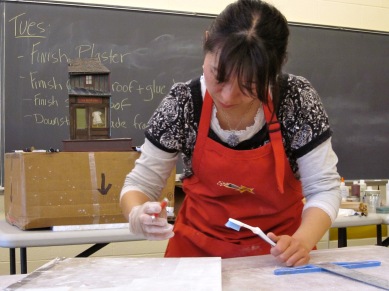
Refining the surface with a toothbrush and knife.
If you’re after a very smooth surface, use a single-edge razor blade and toothbrush to further smooth and flatten the surface. If the plaster mix gets stiff and hard to work with, dump it and start over. Once the surface is fully dry, you can go back and modify or fix problems areas with sandpaper, or more plaster. If you will be carving pavement out of the plaster, it’s best to start while the plaster is still slightly damp.
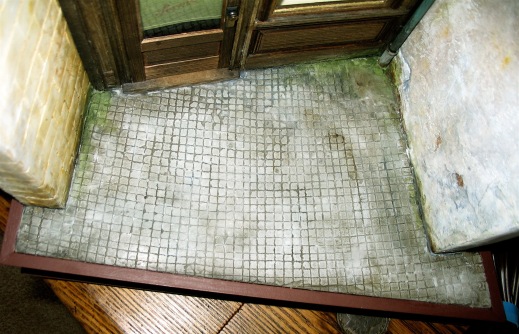
The versatility of plaster can be seen in the photo below. The same material produced both the walls, and the paving stone sidewalk.
The walls were aged with ochre acrylic, and watercolor dirty-water (Mars Black and Raw Umber tube acrylic) washes. The illusion of moss and general grime utilize the dirty-water wash, along with diluted Raw Umber acrylic, and Grumbacher Payne’s Gray and Sap Green watercolor.
Always looking to add interest and texture to our work, Noel included both cedar shingles and copper roofing for the project. 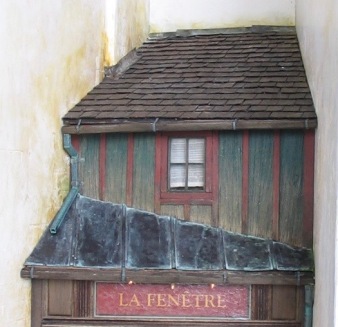
The copper is 32 guage copper tooling foil from Dick Blick. The flashing is molded wine-bottle lead, aged with Brass Black from Whittemore Durgin. The left downspout is square basswood stock, cut at angles, glued together with Elmer’s white glue, and spray painted antique bronze. You can play around with Patina Green chemical, and acryclic washes for more or less aging. The gutter is basswood, clipped to the edge with wine-battle lead.
Maggie Zimmerman has finished both roof sections. The tall side walls of the flanking buildings were not attached until the project was done and ready to be set in place. It also made them easier to ship.
This, complete with classroom spills, was our diagram for making drain pipes:
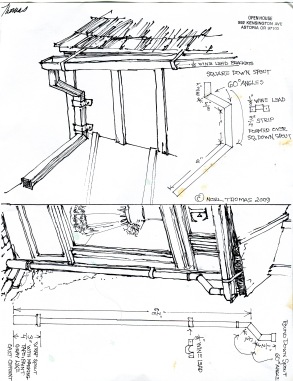
The diagram below is one of those “everything else” pages Noel put together when I said we needed more explanation–board and batten siding, door diagram and roof flashing instructions: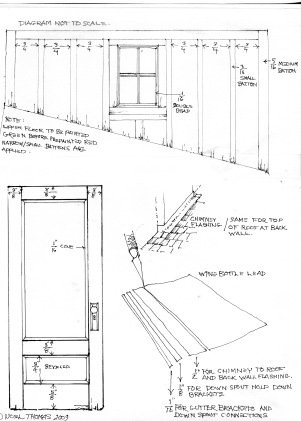
We thought of the front of the shop as an assemblage of picture frames–one for the sign, one for the door, and the fanciest for the window.

As always the students amazed us by getting all this done in 6 days.
The sign was a cheat–there were just too many mini projects within the whole to make it from scratch in class. Most students would choose a different name, but they also would want a sign for the final day exhibit, so I color printed the signs at home on a medium brown card stock. Noel touched-in the lettering with gold paint. In class the students painted on Mod Podge to seal it, as well as bring out the colors, and to create the look of mini-brushstrokes.
Inside looking out
Lighting for the front window display–not pretty, but we weren’t planning on finishing the inside, so this was easy back stage magic. There’s also a dim light in the upstairs window, just to give the illusion of reality another little kick.
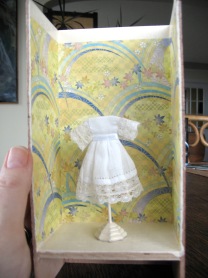
I took the window dressing idea from a Parisian baby store with white christening gowns hanging from a clothesline in the window. The hardest part was scaling down the dress to look right in the window–not a very big space. Knowing I was mini-dress challenged, Susan Rhoades kindly sent me a beautiful dress for our window, but it was too big for the space. I used old handerchief material for the fabric, and stitched on the ribbon at the waist. It is stuffed with cotton balls to fill out the form, and the rest is fabric glue and luck. The background is origami paper.
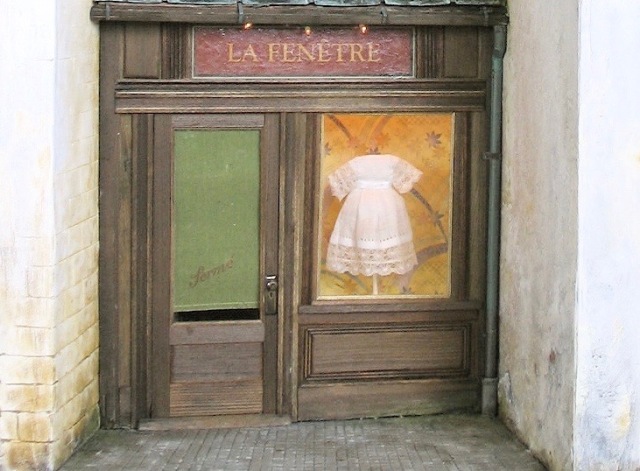
The dilemma of what to do with the front door (so that the lack of interior decor wouldn’t ruin the illusion) came from a story our friend Melanie Wilson told. One day in Paris she had seen a little shop she fell in love with, but was too rushed to stop in and explore. The next day when she went back, her last day in Paris, there was that little sign: Fermé . Closed.
We loved the story and had to include it in the project–the closed window shade would conceal the empty space behind. Rather than risk trying to hand-letter it on our dwindling supply of old window roller shades (that our students needed) we had a rubber stamp made, which we tried first with a gold inkpad, only to find it unreadable–the value of the green and gold were too close. Due to some quirk in the combination of old roller shade and ink, it was red ink that came out looking gold.
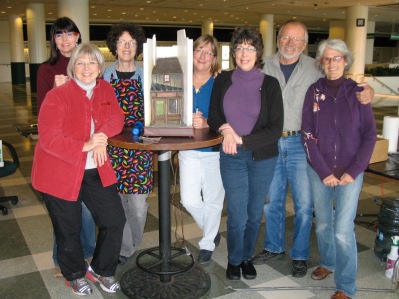
Chicago, class of 2009
This is our swan song, or, as the French would say, Le chant du cygne–an emotional farewell. I’m finding this difficult to write–we have come to the end of our long run as miniaturists. The end really came in 2011, our final year of teaching at the IGMA Guild School, but the blog has helped extend it in our minds. Beginning in 1974, we built a total of 62 structures, and reading this blog doesn’t make it any easier to understand how we did it. We worked hard, yes, but we also stumbled upon miniatures just as it was having a re-birth in So. California. Yes, we were lucky to be doing something we liked, and to have it appreciated by so many. The best part was the people–our clients, students, and fellow artisans. We thank you all for being part of the ride. I hope this blog stays online and available to fellow miniaturists for decades to come–you’ve been a pleasure to write for.
Au revoir and happy trails from Noel and Pat.


